How to Use Google Lens in a Chrome Browser: The Ultimate Guide
The internet is a profoundly visual place. We scroll through endless feeds of images, from stunning landscapes and delicious meals to must-have fashion items and fascinating historical photographs. For decades, our primary tool for exploring this digital universe has been the humble text-based search bar. We struggled to put visuals into words, typing clumsy descriptions like “blue patterned dress with short sleeves” or “old building with columns in Italy” and hoping for the best.
But what if you could search not with words, but with the images themselves? What if you could click on a picture of a plant in an article and instantly identify its species? Or highlight a paragraph from a scanned document in a photo and copy it as editable text? This isn’t science fiction; this is the power of Google Lens, and it’s built directly into your Chrome browser.
Once a mobile-only curiosity, Google Lens has evolved into one of the most powerful and practical tools in Google’s entire arsenal. It transforms every image on the web from a static picture into an interactive launchpad for discovery. This guide will walk you through everything you need to know to master Google Lens in Chrome, from the absolute basics to advanced techniques that will fundamentally change how you browse the web.
What Exactly Is Google Lens? More Than Just an Image Search
Before we dive into the “how,” it’s important to understand the “what.” It’s easy to think of Google Lens as just a “reverse image search,” but that description sells the technology short. While a traditional reverse image search is good at finding other places the same or a similar picture appears online, Google Lens does something far more profound: it understands the content within the image.
A Brief History of Visual Search
The journey began with an earlier, more rudimentary app called Google Goggles. It was a novel idea but was often slow and inaccurate. Over the years, advancements in artificial intelligence and machine learning allowed Google to refine the concept. Lens was officially born, first appearing as an exclusive feature on Google’s Pixel phones before migrating to the Google Photos and the primary Google App on all smartphones. Its integration into the Chrome desktop browser is the final step in its evolution, bringing its power to the platform where many of us do our most serious browsing and research.
The Technology Behind the Magic
How does it work? Google Lens combines two core pieces of Google’s technological prowess:
- Computer Vision: This is the science of teaching computers to “see” and interpret the visual world. When you show Lens an image, its AI models work to identify and classify everything in the scene—objects, people, animals, text, and landmarks.
- Google’s Knowledge Graph: This is Google’s massive, interconnected database of facts about people, places, and things. It’s the “brain” that understands, for example, that the “Eiffel Tower” is a landmark in “Paris,” which is the capital of “France.”
When you use Google Lens, its computer vision analyzes the pixels, and the Knowledge Graph provides the context. It’s not just matching patterns; it’s making an educated guess about what you’re seeing and what you might want to know about it. This is why Lens can identify a specific breed of dog, translate a foreign menu, and let you copy text from a photo—it understands the subject, the words, and the context.
Getting Started: All the Ways to Access Google Lens in Chrome
Google has made launching a visual search incredibly simple. There are several ways to activate Lens, depending on your situation.
Method 1: The Right-Click Context Menu (The Easiest and Most Common Method)
This is the method you will use 99% of the time. It’s fast, intuitive, and works on almost any image you find on the web.
- Navigate to any webpage in your Chrome browser.
- Find an image you want to learn more about. This could be a product in an online store, a building in a travel blog, or a piece of art on a museum website.
- Right-click directly on the image. This will open the context menu.
- Select “Search image with Google” from the menu options.
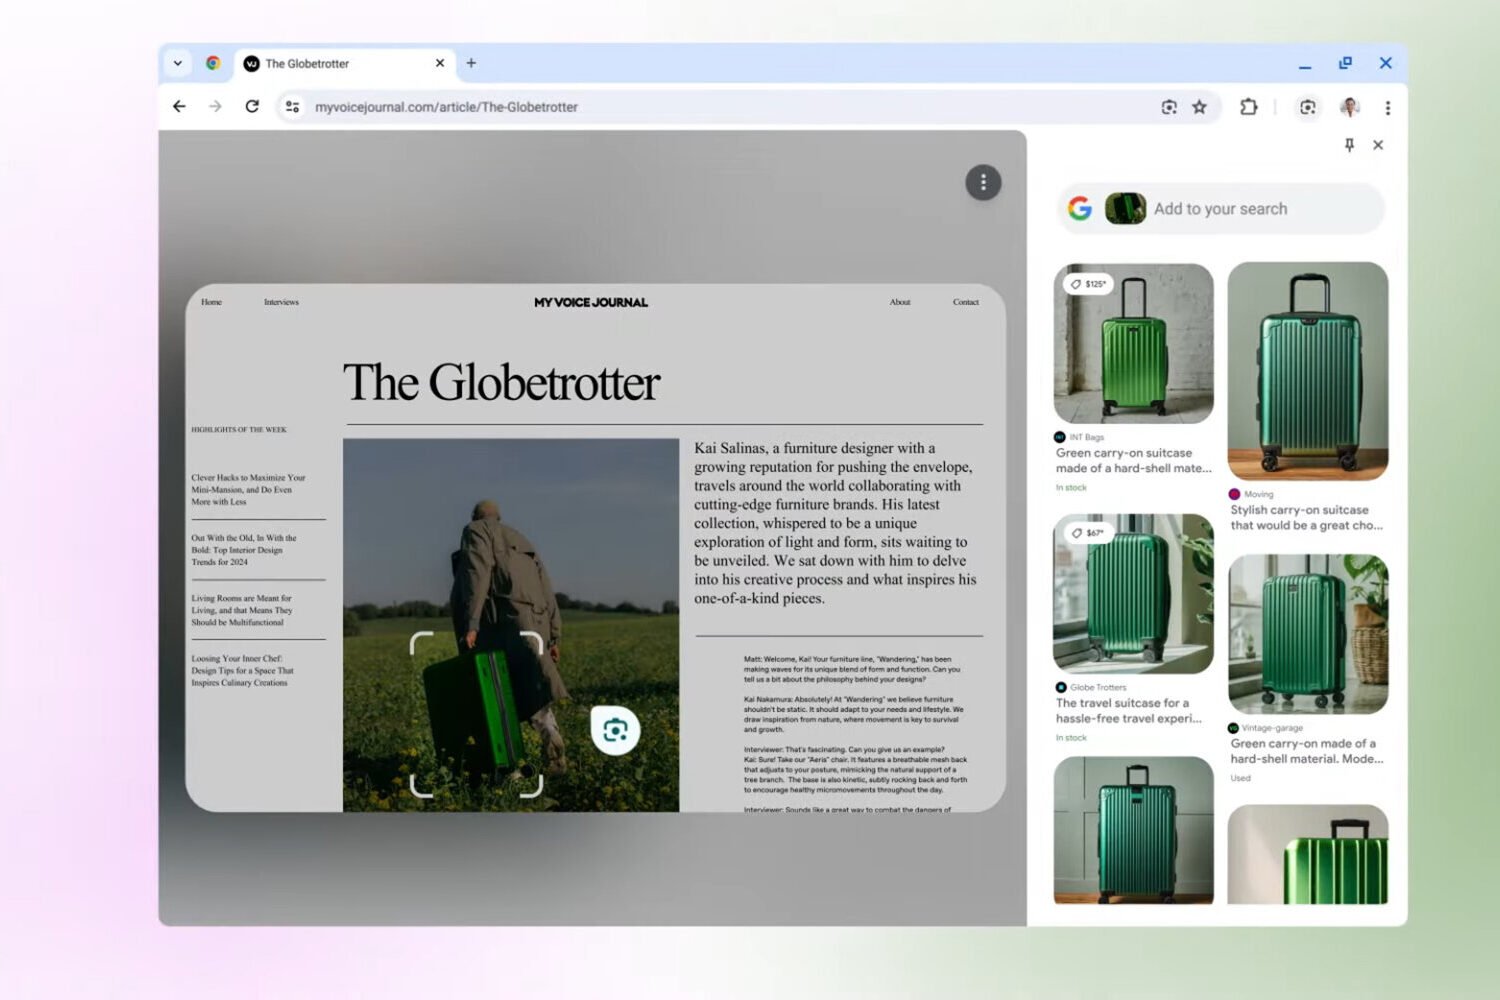
Instantly, a new panel will slide out from the right side of your browser window, displaying the Google Lens results. Your original webpage will remain open on the left, allowing you to compare and continue browsing.
Method 2: Drag and Drop an Image
This method is perfect if you have an image file saved on your computer that you want to investigate.
- Open a new tab in Chrome and go to images.google.com.
- Locate the image file on your computer (e.g., on your Desktop or in your Downloads folder).
- Click and drag the image file from your folder and drop it anywhere in the search bar area of the Google Images page.
- Lens will immediately upload the image and show you the results.
Method 3: Manually Uploading an Image File
This achieves the same result as dragging and dropping but through a more traditional file upload interface.
- Navigate to images.google.com.
- Click on the camera-like icon in the search bar. This is the Google Lens icon.
- A new dialog box will appear. Click the “Upload a file” button.
- Your computer’s file explorer will open. Navigate to and select the image you want to search with, and click “Open.”
Deconstructing the Google Lens Interface
Once you’ve initiated a search, you’ll be presented with the Lens side panel. Understanding this interface is key to getting the most out of the tool.
The Main View
At the top of the panel, you’ll see your source image. By default, Google Lens analyzes the entire picture. However, the most powerful feature here is the adjustable search area. You can click and drag the corners of the white bounding box to crop the image and focus Lens’s attention on a specific object. For example, in a photo of a fully furnished living room, you could drag the box to isolate just the floor lamp, forcing Lens to ignore the sofa and coffee table for more accurate results.
The Three Core Functions: Search, Text, and Translate
Below your source image, you’ll see three powerful tabs that represent the core functions of Google Lens.
- Search (Default Mode): This is the primary object recognition mode. Lens identifies the main subject of your selected area and provides a wealth of information. This includes a potential name for the object (e.g., “Eames Lounge Chair”), a grid of visually similar images from across the web, and links to pages where that image appears. This is your go-to tab for identifying products, plants, animals, and landmarks.
- Text: If Lens detects any text within your selected area, this tab becomes active. Clicking it will automatically perform Optical Character Recognition (OCR) to identify and highlight all the words in the image. You can then select this text with your mouse just as you would on a normal webpage. Once selected, you have several options:
- Copy text: This is a lifesaver for pulling quotes from articles saved as images, contact information from a picture of a business card, or data from a chart.
- Listen: Chrome will read the selected text aloud to you.
- Translate: A quick link to jump to the Translate function.
- Translate: This tab is a magical tool for overcoming language barriers. When selected, Lens will scan the image for foreign text and automatically translate it, overlaying the translation directly onto the image while attempting to match the original font and background. You can use the language dropdown menu at the top to either auto-detect the language or specify it yourself. It’s perfect for translating menus, signs, or passages from scanned foreign documents.
Unlocking the Power: Real-World Use Cases for Google Lens
Knowing how the buttons work is one thing; knowing how to apply them in practical ways is another. Here are just a few scenarios where Google Lens in Chrome can be an absolute game-changer.
For the Savvy Online Shopper
You’re scrolling through an Instagram influencer’s post and see the perfect pair of sneakers. Instead of heading to Google and typing “white sneakers with green logo,” you can simply right-click the image, select “Search image with Google,” and let Lens do the work. It will likely identify the exact brand and model, providing you with direct shopping links. Even better, it will show you a grid of “visually similar” items, allowing you to discover other brands with a similar style, often at different price points.
For the Student and Researcher
You’re writing a research paper and find a crucial chart in a Google Books preview that won’t let you copy the text. Take a screenshot of the chart, drag it into Google Lens, and switch to the “Text” tab. You can now copy the data points, the title, and the source information without having to manually retype a single word, saving you time and preventing transcription errors. It’s also an invaluable tool for fact-checking by finding the original source of an image or data visualization.
For the Curious Traveler (Armchair or Otherwise)
You’re reading a travel blog and come across a breathtaking photo of a castle perched on a cliff, but the author forgot to name the location. Right-click and let Lens analyze it. In seconds, it will likely identify it as “Predjama Castle in Slovenia,” and the results panel will be filled with links to its Wikipedia page, travel guides, and other photos, satisfying your curiosity and perhaps even inspiring your next vacation.
For the DIY Enthusiast and Problem-Solver
Your dishwasher is making a strange noise. After some online searching, you find a forum post with a picture of the machine’s internals, and someone has circled the part that needs replacing. You have no idea what it’s called. Use Lens on that part of the image. It can identify the component as a “drain pump,” potentially even providing a part number and links to online appliance stores where you can buy a replacement.
For the Foodie and Home Cook
You see a mouth-watering picture of a pasta dish on Pinterest, but the recipe is in Italian. Use Lens and switch to the “Translate” tab. The entire recipe will be translated in-place, allowing you to understand the ingredients and instructions. Alternatively, if you just see a picture of a dish you don’t recognize, the “Search” function can identify it (e.g., “Cacio e Pepe”) and provide you with links to countless recipes and videos.
Pro Tips and Advanced Techniques
- Isolate and Conquer: The single most important tip is to always refine your search area. The more you can crop the image to the specific object of your interest, the more accurate your results will be.
- Combine Text and Visuals: Lens is powerful, but you can make it even smarter. After Lens identifies an object, you can add clarifying keywords into the search bar at the top of the side panel. For example, after Lens identifies a “leather armchair,” you can add the word “replica” or “affordable” to the search bar to further refine the results.
- Beat the Blockers with Screenshots: Some websites disable the right-click function to protect their images. You can easily get around this. Use your computer’s built-in screenshot tool (Windows Key + Shift + S on Windows, Cmd + Shift + 4 on Mac) to capture a portion of your screen. The screenshot is saved to your clipboard or desktop, and you can then paste or drag it into images.google.com to use Lens.
Conclusion: A New Way to See the Web
Google Lens in Chrome is more than just a clever gadget; it represents a fundamental shift in how we can interact with information. It breaks down the barrier between the visual and the searchable, transforming the web from a collection of static pages into a dynamic, interconnected, and explorable environment.
It’s a tool that fuels curiosity, simplifies complex tasks, and provides answers to questions you didn’t even know how to ask. The next time you see something online that piques your interest, remember that the answer isn’t a paragraph of text away—it’s just a right-click away.
